 A few months ago, I went ahead and backed a Kickstarter by Creality for their newest CR-6 SE 3D Printer, with the idea it would replace my Ender 3. As you might have gathered over the last few months, the Ender 3 was giving me nothing but headaches, even after I disassembled it, reassembled it, replaced many of the parts, the whole nine yards. This new printer was boasting many qualities that I would have to spend a lot of money on to improve the Ender 3, and hope I had the ability to actually install them properly. The CR-6 boasted a color touch screen, quiet motors, dual Z-Axis for stability, and most importantly, it was self-leveling. So, after a discussion with Lizz, a look at our finances, and watching a couple of the 3D Printing Nerd’s videos (this one and this one), I went ahead and put my money down on one of them.
Fast forward to the end of July, when I received notification that my printer was on its way over from China. If I said I wasn’t checking the tracking number every few days to see if it had cleared in the United States, and was on its way across the country, I’d be a filthy liar. What can I say, I’m easily excited! Finally, on the 20th of August, I looked at the UPS site and it was on its way from Cerritos, California! I checked daily, and it looked like it was going to be delivered on Wednesday, the 26th. Unfortunately, that excitement was tempered a bit when I saw this tweet shared, talking about “another” CR-6 going up in smoke! This was two hours before I received the box, and as I was waiting, I made the mistake of reading through many of the posts about it, and I started feeling sick to my stomach. Let’s be honest, here. I haven’t had the best luck with 3D Printers. I never could get a Monoprice Maker Select working, my Ender 3 was hit and miss, my CR-10 S4 worked great until I tried my first helmet, and then it died, and I’m still trying to wrap my head around how to slice miniatures for my ANYCUBIC Photon resin printer. Still, there were hundreds out there, and that tweet only mentioned about eight so far, right? I should be fine, right?
When it came in, I just put the box on the table and got to work making dinner. Later Wednesday evening, I crossed my fingers and cracked the box open while Lizz worked on her computer. The assembly was very straight forward. Remove everything from the box, attach the gantry to the base, attach the screen to the base, attach the handle (yes, handle) to the top, plug in a few very clearly marked wires, attach a spool holder, and insert filament. Then, as Lizz ran video (just in case), I flipped the power switch.
The printer powered on. That’s it.
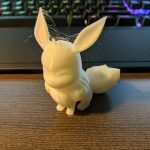
After I slowly exhaled, I ran the self-leveling feature, then started printing some of the included files. Pictures of most of these will be at the bottom of the post. First up was the “dragon” which was more of a flexible T-Rex. Next up was an Eevee, which came out clean and adorable. The final piece off of their card was the “cat” which printed completely hollow, and beautifully, and was given to the teen. Then, I started some serious printing.
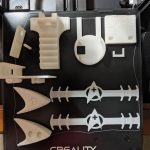
Currently, I’m in the middle of a fairly large project that I’m kinda keeping under wraps, as a surprise for someone. However, I went ahead and tried to load up the print bed a few days ago with  some smaller stuff I wanted, which is something that’s always failed in the past. This time, though, the only issues with the print was when I put pieces too close together, or too close to the edge, and things got cut off. I’m still not comfortable running it overnight, but as I’m in the office with it most of the day, I can easily print out one or two small pieces while I’m in here. All in all, I’ve had it running about ten hours a day, every day since the 27th, and it’s performing like a champ. The bed leveling is a breeze, the pieces have come out beautifully, and the only issue I’ve had is a slight glitch with the filament sensor, which honestly took me a few minutes to realize had triggered, because the printer is so damn quiet (all I hear are the cooling fans). That was cleared up by hitting Resume on the touch pad, and I haven’t had an issue since. Every piece has adhered to the build plate without any aid, like painters tape or hair spray, and I have yet to print anything with a raft. Overall, this has been the most painless 3D printing experience I have ever had, especially with a machine straight out of the box, with no modifications or tweaking.
The Creality CR-6 SE is available now, though they’re selling out pretty quick, even with some of the issues other units have had. You might be able to find them on Amazon (if you look, do me a favor and use that affiliate banner on the page?), or you can order them directly off Creality’s website at https://www.creality3dofficial.com/products/creality-cr-6-se-3d-printer which I’m giving the full link for so you don’t get everything mixed up with the UNOFFICIAL Creality site which uses their name at a .shop link. Just remember, I’m recommending the the caveat that you keep an eye on your printer until you’re certain it’s not one of their defective ones.
So, with that, I’m going to leave you all some photos of what I’ve printed, along with information on where to find the files that didn’t come off the printer’s memory card, and I’ll see you all next week!
Files
- Garmin Vivoactive 4 Dock Stand – Thingiverse
- Nintendo Switch Adjustable Stand – MyMiniFactory
- Star Trek Discovery Enterprise Security / Engineering Badge – Thingiverse
- Star Trek Medical Ear Savers – Thingiverse
Leave a Reply